本文我们来一起探索下ELF的真容。我们将尝试从头开始以十六进制生成Linux的”Hello world”程序。为了讲解最底层的ELF原理,我们这里尽量不使用gcc,ld等编译工具。希望通过本文,让读者对操作系统如何加载和运行程序的原理有所了解。
为了使生活更轻松,本文将仅关注一种体系结构:AMD64(x64)和一种操作系统Linux。不需要编译器、链接器甚至标准库。我们创建最简单的ELF可执行程序,直接使用系统调用。我将详细介绍并描述所有“源代码”,即十六进制的文件。然后使用工具’xxd’将其转换为二进制文件。
输入和输出
本文讲解过程的输入将是一个或多个文本文件,其中包含ASCII格式的十六进制数字。示例中包括注释,但是,这些注释不会对输出有影响。
输出将是ELF格式的可执行程序文件。同时,可以借助objdump -a 来反汇编ELF,学习内部结构。
最小ELF可执行文件的结构
尽管这里所谓的“最小ELF”距离真正意义上的“最小ELF”还是有段差距,需要进一步的裁剪。但按照ELF的文档来说,已经是“最小ELF”了。
ELF可执行文件需要以下组件:
- ELF header。这始终是ELF文件的第一部分,长度固定64字节。 ELF header是ELF文件中唯一具有固定位置的部分,文件其他所有部分的位置都在ELF header中列出。
- program header(允许多个)。program header的主要作用是说明当前ELF文件有多少个部分需要加载到内存中。
- .text section。含有预编译程序代码的section,被命名为.text,一般ELF里面允许多个,但我们只需要一个。
- .shstrtab section。字符串表。跟程序数据无关,用于保存各section的名称,包括其本身。我们的字符串表将包含两个条目:.text用于程序代码,.shstrtab用于自身。
- 三个64字节长的section header。第一个为零,空section header,不明觉厉!第二个section header定义.text section在文件中的位置和大小。第三个section header定义字符串表的位置和大小。
重要的是要理解,ELF文件中唯一位于固定位置的部分是ELF header。所有其他部分可以按任何顺序出现在任何地方。本文选用一种很典型的布局,但不是唯一的(见图)。要构建文件,我们需要知道每个组件的位置(文件中的偏移)。让我们看看如何计算这些偏移量。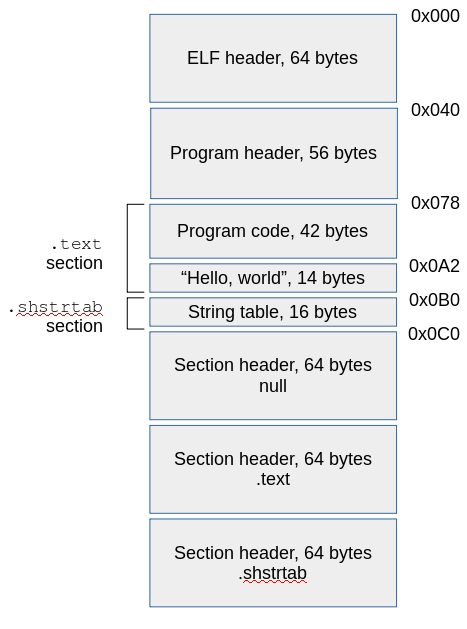
构建可执行文件
本节中,描述如何用十六进制代码构建上图概述的可执行文件的各个组件。为了直观和方便,我会反复的来参考上图,来计算偏移量等。
计算section的大小和偏移量
首先是简单的:ELF header,program header和section header都是固定大小的。我将program header直接放在ELF header之后,所以program header的偏移量是0x40 (十进制64)。这里使用十六进制数字,因为这些偏移量后面会直接写到ELF文件中。
预先编译的程序代码长42个字节(后面解释),紧跟在program header的后面,因此它的偏移量为0x78(0x40 + program header的大小,固定56字节)。
字符串“Hello world”(14字节)紧接在程序代码后,因此其偏移量为0xA2(0x78 + 42字节)。字符串末尾有一个’\0’的终止符(这里实际上并不是必需的),所以它的大小是14个字节。字符串表(.shstrtab)的开始位置紧跟在0xB0(0xA2 + 14)之后。
字符串表具有两个字符串:.shstrtab和.text。都以’\0’结尾,因此总大小为9+1+5+1 = 16字节。第二个字符串的偏移量.text为10个字节-设置其section header时将需要用到这个offset。
在字符串表的起始偏移量上加上16,就得到第一个section的其实地址0xC0。我们不需要知道其他section的偏移量,因为所有section header的大小都相同(64字节),我们将在ELF Header中指定section header的数量,将所有这些section header大小放在一起,得出的ELF文件的总大小为384个字节。
我们还需要了解一件事,需要加载到内存中的量,也就是需要占用内存的大小。在运行时,我们仅需要文件的开头也就是ELF header的开头处,加载到字符串表的开头。其他的部分在运行时不需要。因此,我们需要从文件开头开始加载64 + 56 + 42 + 14 + 16 = 192 = 0xC0字节。
关于内存映射的说明
为了编写实际的应用程序(或针对它们的编译器),我们需要详细了解适用于目标体系结构的内存映射模型。但是,对于本示例,我们只需要知道AMD64体系结构假定可执行代码将从虚拟地址0x400000(4 MiB)开始。出于各种技术和历史原因。本质上,此地址是从零开始的第一个最大的内存页面。
一般情况下,不希望任何程序从0x0开始。现在,尽管AMD64体系结构名义上具有48位虚拟地址空间,但大多数指令仅采用32位直接操作数(如我们稍后将在程序代码中看到的)。需要特殊的技术来处理超出32位偏移范围的内存。因此,我们希望将程序代码放在除了0页面意外的尽可能低的虚拟内存页面中。
无论出于何种原因,我们都需要设置program header,以将二进制文件的相关部分加载到内存中,起始地址为0x400000。因为这将包括ELF header和program header,以及程序代码。程序代码这里以偏移量0x78开始,因此虚拟地址中将在0x400078开始。
0x400078是一个常见的起始地址,通常在未指定称为_start的符号,则GNU链接程序ld会默认使用这个地址。当然,本文没有使用链接器,而是我们自己做了链接器做的工作,指定程序的起始地址。
创建ELF header
现在,我们有了填充ELF header所需的所有信息:我们知道所有相关的偏移量是什么,我们知道在哪里加载二进制数据以及加载多少。我们知道有三个section header,并且第二个section包含字符串表。
ELF header有据可查,这里不描述每个成员的作用,具体可以参考文末的ELF官方文档。我在下面的十六进制数据中添加了注释,以解释各种设置,这些注释不会成为可执行文件的一部分,在生成可执行程序之前,我们会将其删除。
1 | # ELF header -- always 64 bytes |
构建program header
我们此时同样有足够的信息构建program header了。注意,有些重复的信息已经在ELF header中出现过了。同样,我们在十六进制中放置了一些注释,这里不再解释每个设置。
1 | # Program header -- always 56 bytes |
“编译”程序
我们自己创建的可执行程序做两件事:
- 打印“ Hello,world”到标准输出。
- 退出。
对于编程语言,我们通常不必将“退出”视为强制性操作,程序通常在执行完之后就会停止并返回。但是,在机器语言中,需要特定的退出操作。
打印和退出都通过“syscalls”实现,即调用内核。参考,Ryan Chapman的这篇文章。
syscall的工作方式非常简单,将syscall编号加载到%rax寄存器中,将参数加载到其他各个寄存器中(所有信息都记录在上一个链接中),然后执行syscall函数。
对于我们构建的应用程序,我们只需要两个syscall:sys_write(1)和exit(60)。
用GNU汇编语言编写代码,我们有:1
2
3
4
5
6
7
8
9mov $1, %rax # sys_write
mov $1, %rdi # file descriptor, 1=stdout
mov $hello, %rsi # buffer
mov $13, %rdx # byte count
syscall
mov $60, %rax # exit
xor %rdi, %rdi # return value, 0
syscall
来看下上面的汇编,除了$hello外,所有放入寄存器的值都是确定的。在这里,我们可以扮演”链接器”(linker)的角色了。我们需要将$hello的值替换为字符串“Hello,world”的(32位)内存地址。还记得我将此字符串直接放在程序代码之后吗?!程序代码的长度为42个字节,从0x40078开始。因此,字符串的位置是0x40078+42 = 0x4000A2。我们需要将其手动插入十六进制代码中的适当位置。
将汇编代码转换为真实的十六进制机器指令有两种方法。一种是花大量时间研究x86参考资料。第二放法是偷懒,使用真正的汇编程序gcc -S得到相对应的机器指令。
这之后,程序代码和文本字符串如下:
1 | # Program code -- 42 bytes |
构造字符串表
目前,字符串标里,只有两个字符串 .shstrtab和.text的ASCII值,以null(/0)结尾,一个接一个。这里是:1
2# String table. ".shstrab\0.text\0" -- 16 bytes
2e 73 68 73 74 72 74 61 62 00 2e 74 65 78 74 00
构造section header table
如上面所描述,共有三个section header,全部为64自己长度。
第一个很简单,全为零。第二个section header 描述了.text segment,如下所示:1
2
3
4
5
6
7
8
9
10
11
12
13
14
15
16
17
18
19
20
21
22
23
24
25
26
27
28# Section header table, section 1 -- program text -- 64 bytes
# 0x0A = offset to the name of the section in the string table
0a 00 00 00
# 1 = type: program data
01 00 00 00
# 0x06 flags = executable | occupies memory
06 00 00 00 00 00 00 00
# 0x400078 address in virtual memory of this section
78 00 40 00 00 00 00 00
# 0x78 = offset in the file of this section (start of program code)
78 00 00 00 00 00 00 00
# 0x38 = size of this section in the file: 56 bytes
38 00 00 00 00 00 00 00
# sh_link -- not used for this section
00 00 00 00 00 00 00 00
# 0x01 = alignment code: default??
01 00 00 00 00 00 00 00
# sh_entsize: not used
00 00 00 00 00 00 00 00
注意,section header描述了section在文件中的位置,它的大小以及将其加载到内存中的位置。
这是字符串表的section header:1
2
3
4
5
6
7
8
9
10
11
12
13
14
15
16
17
18
19
20
21
22
23
24
25
26
27
28# Section header table, section 2 -- string table
# 0x0 = offset to the name of the section in the string table
00 00 00 00
# 3 = type: string table
03 00 00 00
# 0x0 = flags
00 00 00 00 00 00 00 00
# 0x0 = address in virtual memory (not used)
00 00 00 00 00 00 00 00
# 0xB0 = offset in the file of this section (start of string table)
b0 00 00 00 00 00 00 00
# 0x10 = size of this section in the file: 16 bytes
10 00 00 00 00 00 00 00
# sh_link -- not used for this section
00 00 00 00 00 00 00 00
# 0x01 = alignment code: default??
01 00 00 00 00 00 00 00
# sh_entsize: not used
00 00 00 00 00 00 00 00
注意,字符表section header里面没有内存地址,它不会被加载到内存。
放在一起
我们可以使用工具xxd,把前面我们用文字描述的十六进制代码转换为二进制文件,但我们需要先删除注释。一个很简单的脚本如下:
1 | BINARY=elfdemo |
该脚本仅将所有单个十六进制文件串联为一个大文件,过滤掉注释,然后将结果传递给xxd转换为二进制文件。如果一切顺利,则生成的elfdemo将为384个字节长,这个我们前面已经计算过。运行生成的二进制文件:
1 | $ ./elfdemo |
鸣谢Kevin Boone教授的指导
https://github.com/ysun/elfdemo
http://kevinboone.me/elfdemo.html?i=3
ELF文件结构详解
图解 Linux 程序的链接原理
ELF文件解析(一):Segment和Section
目标文件和ELF格式详解
史上最小可执行 ELF 文件
What’s the difference of section and segment in ELF file format
Simple Linker Script Example
X86 Opcode and Instruction Reference
X86 Opcode and Instruction Reference Home
ELF Hello World Tutorial
elf(5) — Linux manual page
Smallest x86 ELF Hello World